GitHub Actions는 GitHub에서 제공하는 CI/CD 서비스이다. GitHub 레포지토리에 이벤트가 발생한 시점에 맞춰 워크플로우를 실행할 수 있고, 이를 통해 빌드, 테스트, 배포 등을 자동화할 수 있다.
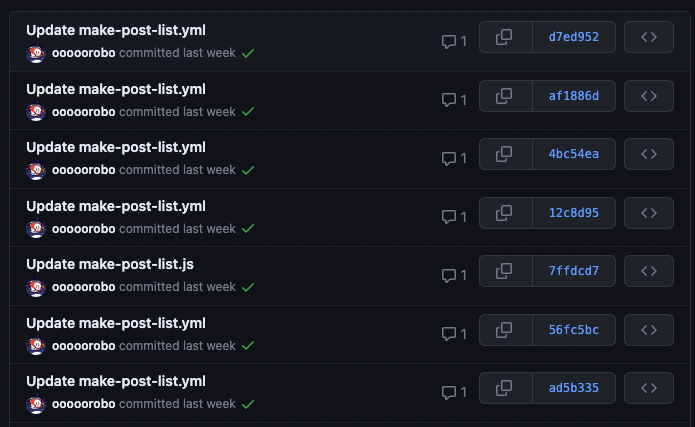
워크플로우가 잘 작동하는지 확인하기 위해 커밋을 자꾸 푸시하다 보면, 위와 같이 커밋 목록이 너무 지저분해진다. 이럴 때는 로컬에서 워크플로우를 실행해보면 좋다.
act를 사용하면 깃허브 액션 워크플로우의 작업을 로컬에서 실행시켜 볼 수 있다. GitHub Actions를 통해 실행되는 것과 거의 흡사하게 동작하기 때문에 yaml 문법 오류 등 웬만한 오류는 미리 잡아낼 수 있다.
하지만 GitHub 액션과 완벽하게 똑같이 동작하는 것은 아니기 때문에, 일부 액션이 GitHub Actions에서는 다르게 동작할 수 있다는 점을 주의해야 한다.
act로 job 실행하기
act는 도커를 기반으로 동작하기 때문에, 먼저 도커를 설치해야 한다. 도커는 여기에서 설치할 수 있다.
act 설치는 여기를 참고하여 사용하는 패키지 매니저에 맞춰 설치하면 된다. GitHub CLI extension으로도 제공된다!
act를 설치한 후, 워크플로우를 실행하고 싶은 레포지토리로 이동해 아래 커맨드를 실행하면 실행할 수 있는 job 목록을 보여준다.
1➜ act -l23Stage Job ID Job name Workflow name Workflow file Events40 make make make recent post list make-post-list.yml push50 test_repo_dispatch test_repo_dispatch test_repo_dispatch.yml test_repo_dispatch.yml repository_dispatch60 update-cache update-cache update-cache.yml update-cache.yml push
act -j <job name> 커맨드를 입력하면 해당 job을 실행할 수 있다.
job 실행 예시
아래는 node_modules를 캐싱하는 job을 실행한 예시이다. GitHub Actions를 통해 실행했을 때와 마찬가지로 actions/checkout, actions/cache 등의 액션도 실행 가능하다.
1➜ act -j update-cache23[update-cache.yml/update-cache] 🚀 Start image=catthehacker/ubuntu:act-latest4[update-cache.yml/update-cache] 🐳 docker pull image=catthehacker/ubuntu:act-latest platform= username=5forcePull=true6[update-cache.yml/update-cache] 🐳 docker create image=catthehacker/ubuntu:act-latest platform= entrypoint=["tail"7"-f" "/dev/null"] cmd=[]8[update-cache.yml/update-cache] 🐳 docker run image=catthehacker/ubuntu:act-latest platform= entrypoint=["tail" "-f"9"/dev/null"] cmd=[]10[update-cache.yml/update-cache] ☁ git clone 'https://github.com/actions/cache' # ref=v311[update-cache.yml/update-cache] ☁ git clone 'https://github.com/actions/setup-node' # ref=v312[update-cache.yml/update-cache] ⭐ Run Main checkout13[update-cache.yml/update-cache] ✅ Success - Main checkout14[update-cache.yml/update-cache] ⭐ Run Main cache15[update-cache.yml/update-cache] 🐳 docker exec cmd=[node /var/run/act/actions/actions-cache@v3/dist/restore/index.js]16user= workdir=17[update-cache.yml/update-cache] 💬 ::debug::Resolved Keys:18[update-cache.yml/update-cache] 💬 ::debug::["yarn-9cc36377e528932831996b38128b0fdc6877c9ca79b68cc3d5662350b35f01ca"]19[update-cache.yml/update-cache] 💬 ::debug::Checking zstd --quiet --version20[update-cache.yml/update-cache] 💬 ::debug::1.4.821[update-cache.yml/update-cache] 💬 ::debug::zstd version: 1.4.822[update-cache.yml/update-cache] 💬 ::debug::Resource Url:23http://192.168.0.5:61533/_apis/artifactcache/cache?keys=yarn-9cc36377e528932831996b38128b0fdc6877c9ca79b68cc3d5662350b35f01ca&version=7fcda33c1e1d849a13bcc06f49b9ab64efc01ca9dabe4d7a8d0d387feef4fc8824[update-cache.yml/update-cache] ⚙ ***25[update-cache.yml/update-cache] 💬 ::debug::Cache Result:26[update-cache.yml/update-cache] 💬27::debug::{"archiveLocation":"***","cacheKey":"yarn-9cc36377e528932831996b38128b0fdc6877c9ca79b68cc3d5662350b35f01ca","result":"hit"}28[update-cache.yml/update-cache] 💬 ::debug::Archive Path: /tmp/04d57fde-08fb-4a24-b454-0f5810184ed4/cache.tzst29(생략)30| Cache Size: ~50 MB (52189089 B)31| Cache restored successfully32| Cache restored from key: yarn-9cc36377e528932831996b38128b0fdc6877c9ca79b68cc3d5662350b35f01ca33[update-cache.yml/update-cache] ✅ Success - Main cache34[update-cache.yml/update-cache] ⚙ ::set-output:: cache-hit=true35[update-cache.yml/update-cache] ⭐ Run Post cache36[update-cache.yml/update-cache] 🐳 docker exec cmd=[node /var/run/act/actions/actions-cache@v3/dist/save/index.js]37user= workdir=38[update-cache.yml/update-cache] 💬 ::debug::Cache state/key:39yarn-9cc36377e528932831996b38128b0fdc6877c9ca79b68cc3d5662350b35f01ca40| Cache hit occurred on the primary key yarn-9cc36377e528932831996b38128b0fdc6877c9ca79b68cc3d5662350b35f01ca, not41saving cache.42[update-cache.yml/update-cache] ✅ Success - Post cache43[update-cache.yml/update-cache] 🏁 Job succeeded
워크플로우 실행 시 필요한 데이터 전달하기
repository_dispatch 웹훅을 통해 실행되는 액션의 경우, 추가로 필요한 데이터를 받아와야 한다. 이럴 경우 —-event_path 옵션으로 데이터를 넘겨줄 수 있다.
먼저, 데이터를 담는 json 파일을 작성한다.
이 json 파일에 담기는 데이터는 repository_dispatch 웹훅을 트리거할 때 함께 보내는 데이터를 그대로 넣어주면 된다.
1// event-data.json2{3 "client_payload": {4 "testmsg": "헬로월드"5 }6}
그리고 액션을 실행할 때, -e, --event_path 옵션을 사용한다.
1act -j test_repo_dispatch -e event-data.json
이 값은 github.event 값을 통해 접근할 수 있다.
워크플로우 예시
1on:2 repository_dispatch:3 types: [test]45jobs:6 test_repo_dispatch:7 runs-on: ubuntu-latest8 steps:9 - env:10 MESSAGE: ${{ github.event.client_payload.testmsg }}11 run: echo $MESSAGE
결과
1➜ act -j test_repo_dispatch -e event-data.json2[test_repo_dispatch.yml/test_repo_dispatch] 🚀 Start image=catthehacker/ubuntu:act-latest3[test_repo_dispatch.yml/test_repo_dispatch] 🐳 docker pull image=catthehacker/ubuntu:act-latest platform= username= forcePull=true4[test_repo_dispatch.yml/test_repo_dispatch] 🐳 docker create image=catthehacker/ubuntu:act-latest platform= entrypoint=["tail" "-f" "/dev/null"] cmd=[]5[test_repo_dispatch.yml/test_repo_dispatch] 🐳 docker run image=catthehacker/ubuntu:act-latest platform= entrypoint=["tail" "-f" "/dev/null"] cmd=[]6[test_repo_dispatch.yml/test_repo_dispatch] ⭐ Run Main echo $MESSAGE7[test_repo_dispatch.yml/test_repo_dispatch] 🐳 docker exec cmd=[bash --noprofile --norc -e -o pipefail /var/run/act/workflow/0] user= workdir=8| 헬로 월드9[test_repo_dispatch.yml/test_repo_dispatch] ✅ Success - Main echo $MESSAGE10[test_repo_dispatch.yml/test_repo_dispatch] 🏁 Job succeeded
실행 시 자주 겪는 문제
1) Cannot connect to the Docker daemon
도커가 실행되고 있는지 확인하자
2) Could not get auth config from docker config: error getting credentials
도커를 처음 실행한 후 job을 실행하려고 하면 아래와 같은 에러가 발생하는 경우가 있다.
1[make recent post list/make] Could not get auth config from docker config: error getting credentials - err: exec: "docker-credential-desktop": executable file not found in $PATH, out: ``2Error: error getting credentials - err: exec: "docker-credential-desktop": executable file not found in $PATH, out: ``
vim ~/.docker/config.json 커맨드를 입력해서 파일을 열면, 아래와 같이 키 값이 credsStore라고 되어 있을 것이다.
1// as-is2{3 "credsStore": "desktop"4}
키를 credStore 로 수정해서 저장하면 정상 작동한다.
1// to-be2{3 "credStore": "desktop"4}
3) Skipping unsupported platform
act가 지원하는 러너는 ubuntu-latest, ubuntu-22.04, ubuntu-20.04, ubuntu-18.04 뿐이다. window와 macOS 플랫폼은 지원되지 않기 때문에, 워크플로우 works-on에 위 러너 외의 플랫폼이 지정되어 있다면 job을 실행시킬 수 없다.
가장 쉽게 해결하는 방법은 act를 사용하는 동안 works-on을 ubuntu-latest로 설정하는 것이다.